skip to main |
skip to sidebar
One of the joys of taking up a hobby is bring happiness to the people that are most important in your life. After informing my grandmother a couple of weeks ago that I had started making jewelry, she asked me for a favor.
She had been looking for years for light denim blue earrings. Complaining that the only ones she could find were always silvertone, she asked if I could possibly fashion her gold tone earrings that featured that light blue.
I took the challenge on with a relish, though I admit that I always preferred blue with silver. After making the earrings, I was so pleased with the results that I created a bracelet to match them for her.
I plan to ship these out soon, but wanted to share them with you. Even when you think something will not work, you should always give it a try. You might be surprised by the results.
When I get the creative bug, it expresses itself in a variety of ways. Sometimes I redecorate, "nesting" as my mom calls it, or I sculpt some new clay figurines or tackle designing new jewelry.
Many days, I end up in the kitchen attempting a new recipe or just making a classic. I love to cook and I especially love to cook for others. If we are entertaining guests, you can bet that there will be a plentiful spread of food!
Remember those good ol' days of childhood when you would bite into a prepackaged cupcake (golden or chocolate) and be rewarded with the yummy creamy filling inside? Well, at Baking Bites, Nicole Weston has replicated the recipe so you can make your own delicious cupcakes at home! After seeing this several weeks ago, I decided to tackle the Vanilla Filling recipe yesterday.
First, my boyfriend is one of ~those~ people...the cake and the icing have to be different. You know, golden cake, chocolate icing, chocolate cake, vanilla icing...me, I prefer my chocolate with chocolate and topped with....you guessed it! More chocolate.
So, I admit, I did cheat. I did not tackle the cake or frosting recipe that was listed on Baking Bites website. Instead, I pulled out a box of golden cake mix and a container of milk chocolate frosting that I already had in the pantry. This saved on the cost of having to purchase new ingredients for the recipe, as well as avoid the grocery store on a Saturday!
After I baked the cupcakes, I started in on the filling recipe:
Vanilla Cream Filling
3 tbsp all purpose flour
1/2 cup milk (low fat is fine)
1/2 cup butter (or trans fat-free shortening)
1/2 cup granulated sugar
1/2 scraped vanilla bean or 1 tsp vanilla extract
I used just plain vanilla extract, 2% milk and I did use real butter. The first step involves putting the flour and milk into a sauce pot. Using a whisk, you will need to stir the milk and flour continuously over medium heat. Just as you start to think your arm is going to fall off, the sauce will thicken up suddenly. You want it to reach a nice pudding thickness. This will become very obvious as you stir and it starts to scrape off the bottom of the pan and clump.
As soon as it has thickened, pour the mixture onto a wire mesh over a bowl and cover with cling wrap. Let cool to room temperature.
Now, I let mine cool for probably 45 minutes. Not much liquid drained out of the thick mixture...only a few drops.
Once the milk/flour mixture is cooled, cream together the sugar and butter. As soon as the mixture is light and fluffy, combine the milk/flour mixture and the vanilla extract. This is the hard part. Set a timer for 7 minutes and be ready to stand there if you have a hand mixer. If you have a stand, then feel free to grab yourself a drink and relax. With the hand mixer, I kept rotating the bowl a quarter turn as I let it beat the mixture into a beautiful whipped goodness.
Once that is finished, use a paring knife and cut a circle into the top of each cupcake. Pull the cone out and slice the point off. (I put the extra bits of cake into a bowl for a yummy snack, rather than toss them out.)
Spoon the vanilla filling into a baggie or pastry bag, whichever you prefer. I use a zip top baggie and snip the corner off. I had enough to fill 20 cupcakes.
Replace the tops of the cupcakes and ice with your frosting. Again, I use a zip top baggie because I find I can quickly ice cupcakes and make nice swirled designs, rather than using a spreader.
I was amazed at how light and yummy the vanilla filling was inside of the cupcake. It was very rich in combination with the golden butter cake and chocolate frosting, but a bonus to this, you only need one to satisfy your sweet tooth instead of two!
This recipe is definitely going to be stored in my book for future use. As I was finishing the decorations yesterday, I already know the next time I will be making them. I love Halloween and we traditionally throw a party with refreshments for our friends. I will be dividing the filling up and adding some red and green food coloring and adding a ghoulish touches to some scary, but yummy, cupcakes. Check back, because I will definitely post the results here when October rolls around.
Enjoy!
I do not consider myself a superstitious sort of person. I have a black cat, I love Halloween and rarely think of bad luck omens.
That being said, I am not a fan of Friday the 13th. If possible, I would stay at home every time it occurs. I know a person that actually does that, so I know I'm not alone in this thinking. Friday the 13th can happen no fewer than once a year, and more more than nine times in a year (2009 was a great example of this). 2010 only has one 13th Friday (woot!) so it has now passed. Of course, someone backed into my car on this past Friday, then didn't leave me a note.
Ah well. On the eve of the 13th, I pulled out a four-leaf clover pendant that my Mom had found from a local artist in Kentucky during her travels last year. I have pondered what to do with the lovely pendant and really wracked my brain on how best to display it. As I played with it, I started getting a great idea for how to turn it into a necklace. I had found some great silver leaves and started stringing them with freshwater beige and ivory pearls, Swarovski crystals (golden and green), tigereye, unakite and some jasper beads.
Below is my creation...I wore it on Friday and had a great day, though it could have been from my determination to have a good day. Perhaps I should have left it hanging in my car though when I left her alone for five minutes >.<
I hope everyone else had a great day and weekend!
Anyone that knows me, knows that I absolutely love sushi :D
Just the mention of sushi will send me into a craving that cannot be satisfied until I'm sitting in front of a plate of sticky sweet rice with pieces of various seafood draped across it.
So, after I saw some so-so generic glass sushi beads (don't get me wrong, the picture showed absolutely adorable sushi beads that I instantly fell in love with...the customer reviews of broken beads and unrecognizable sushi just scared me away as quickly), I decided to give a try at making my own "sushi" beads.
Here is the result of my Sunday evening task...a pair of earrings with a piece of tamago (a sweet egg) and tuna nigri. I made the mistake of using a pearl clay instead of standard white...so the rice (individually handmade) turned translucent. I don't mind, it gives it a bit of character and these are my first ones (and are staying in my possession) to wear with delight.
Stay tuned! As soon as I master the white rice coloration that I want, I will be posting pieces on my Etsy shop.
Enjoy!
I am absolutely fascinated with butterflies. They dart through the sky in hazardous fashion before landing on a plant for a rest.
I came across these eastern tiger swallowtails while walking to my bus yesterday afternoon. Despite the overcast day, anytime I tried to approach close enough for a shot, they darted away.
This is my favorite action shot...I claim that the butterfly was just camera shy!
Finally, it settled down long enough for me to get a few good shots...
After having multiple horribly stressing jobs, I am lucky enough to be working next to a botanical garden. When I feel the walls closing in around me, I just have to walk straight out of my office and within a hundred yards, I am moving along dirt pathways, surrounded by numerous species of flowers, trees and animals. The other day, while relaxing on one of the multiple park benches, I watched a chipmunk to my left, a squirrel to my right and a rabbit in front of me, forage for food. Another squirrel ran past with a mouthful of pine needles and leaves, building up his nest.
Here are some pictures of my stroll...
So, I dragged myself to bed late on Sunday night, after being determined to finish up a new project of wine glass markers.
As I laid down and turned off the lights, thinking of tasks to do on Monday, my thoughts kept drifting back to the remaining set of wine glass markers that I had not done. I tossed and turned, debating on getting back up to go downstairs and finish them. It was an internal struggle that lasted almost an hour.
This time, sleep won out, thankfully too!
I did finish the second set of wine markers on Monday afternoon as soon as I got in the door from work.
I know I cannot be the only person that has ever dealt with craft insomnia. :D
I have been sculpting polymer clay for several years. I took a break for a couple of years, after losing my muse...and it has only been recently that I have been inspired to return to the art.
One of my favorite things with working in polymer is that I can take a piece of clay and manipulate it into something that takes on its own life. I can then personalize it and give it as a gift to a loved one.
My Dad and I got certified in diving a few years ago together. It was so much fun to take a class together and go through the certification process. At that point, I created a scuba frog out of polymer for him. (I do not have a picture of that original frog, but should I obtain one, I will gladly post it.)
When his birthday came around this year and I asked him what he would like, he said that he wanted another scuba frog to join his first. At this point, I was stumped. I had not really worked with polymer in some time and I had no idea how to "top" that first frog. I contemplated the project for several weeks until I was struck with inspiration while riding the bus home from work. Grabbing my sketch pad, I started frantically sketching out the design so I did not forget my original thoughts.
I had decided that not only would I sculpt a scuba frog, but I wanted to do a combination of mediums to really embrace the diving experience. After a great deal of research, I concluded that one of the best techniques would be to create an "undersea" experience, along with a surface environment.
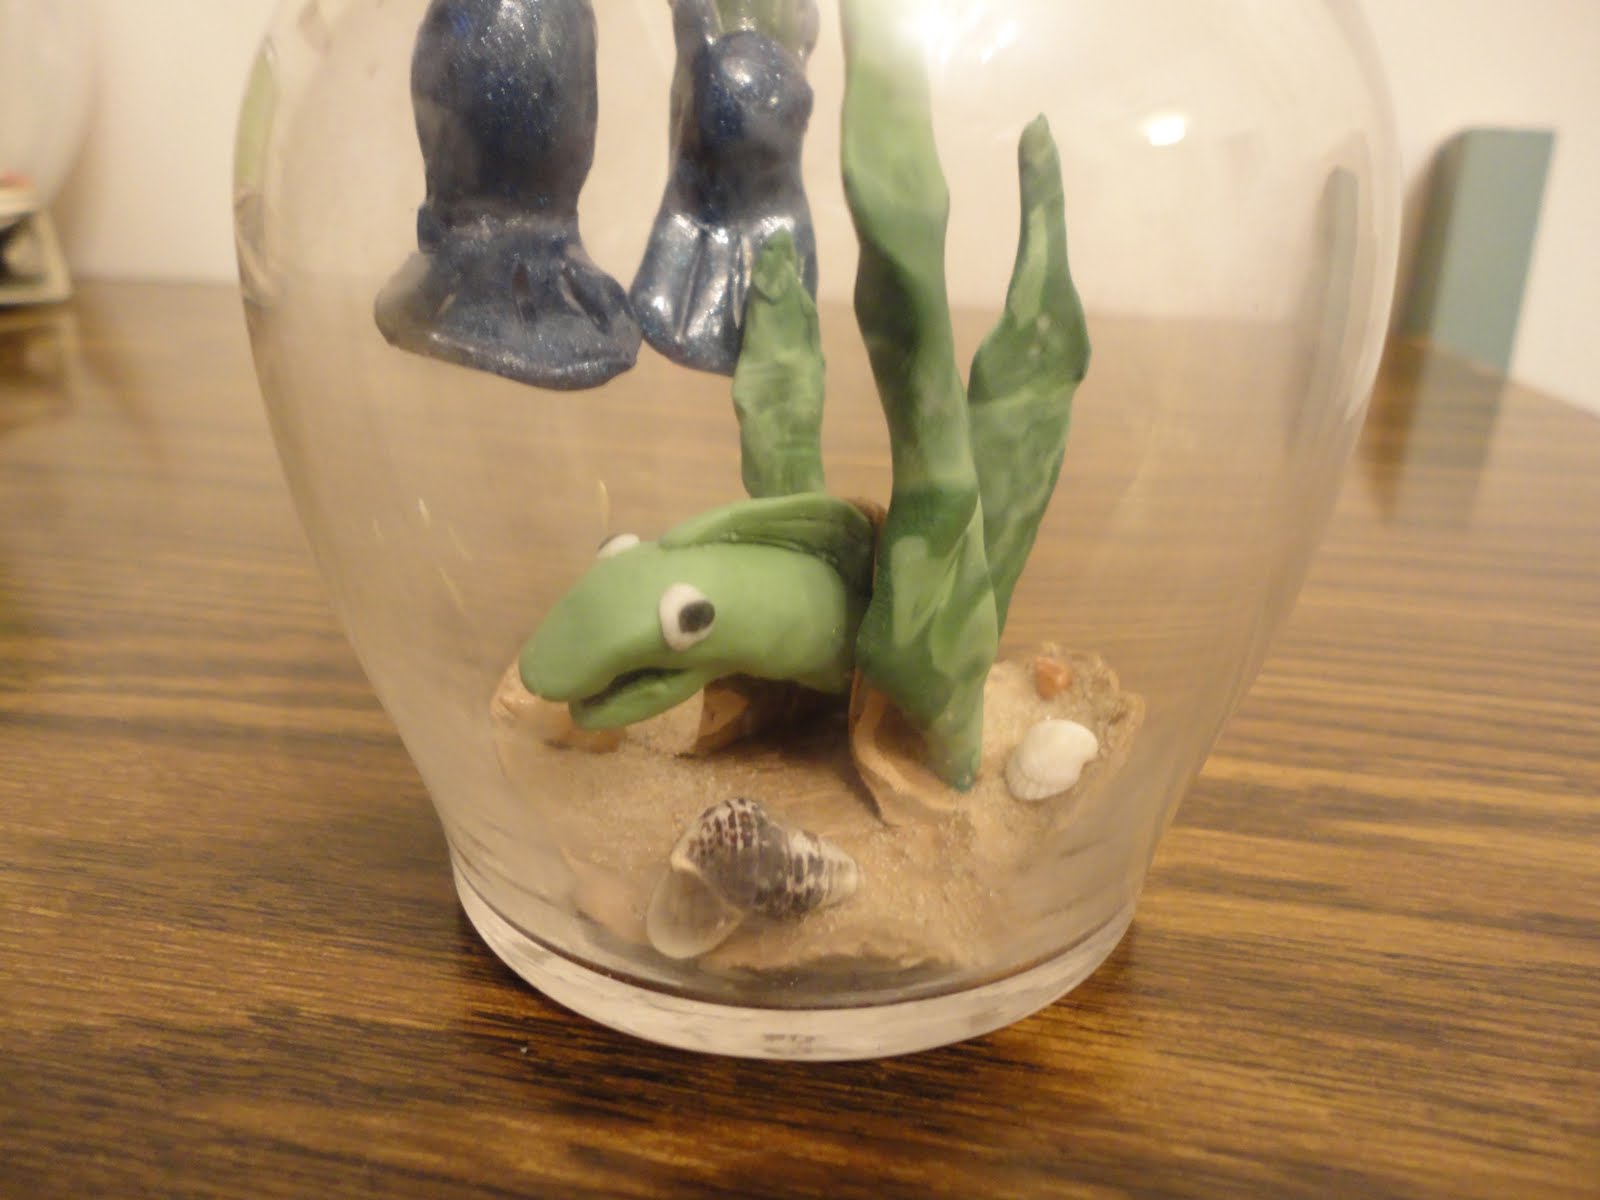
I found a small glass jar and began sculpting a sandy floor by mixing different colors of clay. I then embedded sand into the surface to simulate the ocean floor and placed real tiny shells. I wanted to place another creature into the sculpture, so I worked on a moray eel. He turned out more cartoonish than I wanted, but his personality that came out of the clay amused me. I gave him a small cave for a home and then surrounded him with marbled kelp.
Below are the pictures of the semi-completed project. My scuba frog has been baked and glazed. My next challenge is working on a resin to embrace and simulate water in the glass. I will post updated photos when the project is complete.